The kitchen of the home is a big ticket for selling your property. Prospective buyers spent more time between four walls to know the kitchen. All the more do you realize kitchen staging is vital in giving value to your home. Be it preparing to list the home or for yourself alone, knowing kitchen staging tips can transform an average working kitchen into the selling point that brings top dollar.
Dive deep into the most renowned staging ideas for the kitchen that real estate titans use to make properties look expensive, elegant, and tantalizing to prospective buyers. From strategies for de-cluttering to lighting techniques, these home staging kitchen methods will help open up a room that will look fantastic in photos and will long stand ingrained memories of buyers at showings.
Understanding the Psychology Behind Kitchen Staging
Before getting into the details of putting kitchen staging tips into practice, it is necessary to understand why staging works as effectively as it does. Staging a home has the idea of kitchen spaces that let buyers see themselves living in the house run through it. So, when the kitchen staging ideas are at work, you do not feel as if you are arranging a room, but rather creating an emotional link that visibly drives casual browsers into potential buyers.
The professional kitchen staging professionals understand that buyers are emotionally driven with this process and only engage in logic afterward. Kitchen staging that looks clean, spacious, functional, and aspirational will stir up positive emotion. These kitchen staging ideas work, as they allow distractions to ease aside and point buyers toward the best parts of the space, while they become a platform for some beautiful dreams from the selected target.
The main purpose of any home staging kitchen project is to display potential capacity, not personality, in order to appeal to as many viewers as possible. It’s an undeniable fact that lasting research supports the belief that a staged house bids faster and sells for more than an un-staged one. When you invest time into utilizing kitchen staging tips , basically, you are adding value to your home perception without bearing the expense of a complete renovation. Thus, this good staging tells prospective buyers that this home has been well taken care of, thus erasing their fears about hidden problems and making them more amenable to pay more for the house.
Decluttering: The Foundation of All Kitchen Staging Tips
In any professional culinary setting, ruthless decluttering stands as the first action of the day. This most basic of kitchen staging techniques cannot be emphasized enough. Take away all of the trivial things in your kitchen, such as old posters, etc., to make space seem more darker, fully organized, and more expensive.
These are the sorts of things you should think about and consider when putting your vision together: If they don’t fall in line with any of those thoughts, they must go-literally out of here! The adage: Clear everything out, take away ALL of the issues on your countertops, which, remember, leave just a few, carefully selected decorative objects. Cluttered countertops and chic kitchen staging ideas are incompatible. Take away yummy gadgets like toasters, coffee makers, and blenders, or at least push them far into the background.
Introduce agent-based bidding model numerators for items such as dish racks, paper towel holders, and even your adorable wooden utensil holder. Buyers need not be reminded of the place for coffee, just that their future kitchen will have miles of gleaming counter, uncluttered by the objects of everyday existence(often, just clutter) at present. Any such kitchen staging tips , for removing things-stretches at least fifty percent of the room more and a gazillion times more of the price.
Next step, after that, you can tackle the junk that’s piled and packed in your cabinets and drawers. With unqualified open cabinets increasingly being a norm during showings, it’s more than likely your potential buyers may very well be allowed to peer within. Shave off by at least one-third to even half articles that fill up each cabinet, hence creating room simply to suggest there is adequate storage space. The existing items should be neatly organized with each article well defined, and all the plates with the same pattern should be stacked abreast side by side of one another, such that all their labels echo in the same direction. Such order gives a kitchen a distinct look of organized professional touch, which is why a well-maintained home will never deserve to pass by unordered.
Do not overlook the stage in the kitchen refrigerator. Take everything off and then clean the front and sides- no magnets, photos, children’s drawings, or types of grocery lists. The refrigerator is not part of the home but has to be present and working smoothly as an integral part of the whole kit. And if the interior of your fridge will be visible at showings, go through the same decluttering process, removing expired items, and so forth, and then make your shelves look half-empty, not full…. Even though kitchen home staging may show little signs of luxury and taste, they do add overall value to the property.
Deep Cleaning for Professional Kitchen Staging Results
Cleaning surfaces well is the next crucial step one needs to take after decluttering to use kitchen staging tips effectively. A squeaky-clean kitchen tells potential buyers that the house was kept so well from head to toe. Professional kitchen staging means cleaning to a higher level than routine domestic standards; think in terms of a hotel kitchen and not in terms of lived-in family space. Pay special attention to the more critical, usually overlooked areas that share the most information on a kitchen’s condition.
The detailed kitchen staging tips taught in this guide include: scrubbing the grout between tiles just shy of its original color; buffing every piece of cabinet hardware till they shine; and wiping the grease completely off the cook top and range hood. In with a barely-used look, spray some of this stuff into your oven glass. A proud owner will do all these kitchen staging activities and justify the asking price. Windows and light fixtures are worth their investment, specifically in kitchen staging ideas. Clean and polish windows to let in natural light, in most cases, the most-desired component of any kitchen.
Clean light fixtures and change burnt-out or mismatched bulbs to uniform, high-quality, LED ones that illuminate well and evenly. You may want to put in clean window treatments or be considerate to expose more light by getting rid of heavy draperies. The last stage of good kitchen staging is to address the floor. The floor deserves attention during kitchen staging. Once the floor is clean and polished, such as wet tile, hardwood, or vinyl, it should be allowed to have professional cleaning in case of tile and grout or refinished any worn hardwood.
The floor is an appealing element and can support either the positive or negative effect of your kitchen staging. A beautiful floor, as well as the image of a healthy and clean society, conveys the lavishness that the kitchen staging needs to accrue. In kitchen-home staging, the sink area certainly commands focus. Polish the faucet and fixtures to the extent where they sparkle; remove any water spots or mineral deposits. Also, ensure that the sink basin and drainer are utterly spotless. Replace those dish towels so worn they have high hopes of disintegrating with some fresh, luxurious-looking ones in neutral colors.
If your sink is even moderately weary, then having it entirely replaced would not be a bad idea. This inexpensive upgrade can work wonders for your kitchen and hence is a worthwhile investment when it comes to having kitchen staging ideas executed.
Neutralizing Colors and Updating Paint
Color psychology plays a vital role in the effective kitchen staging tips. While you may love your bold red accent wall or cheerful yellow cabinets, potential buyers must put themselves in the space, which implies a more neutral palette. Neutralizing color scheme for kitchen staging is almost always the rule of professionals for the most appealing meal. If those kitchen cabinets are things of dated or very personal colors, repainting them classic white, cream, soft gray, or greige is one of the most impactful kitchen staging ideas you can implement. Buyer after buyer will ask for white kitchens over any other color option, thus signifying its clean, spacious, and expensive aura.
In line with kitchen staging, cabinet repainting does not necessarily mean cabinet replacement; an expression of applied finish or coating of color can turn an old, tired, dated-looking cabinet into a showpiece of today’s era at a fraction of the cost of completely taking out and replacing it. Wall color should be muted when considering kitchen staging guidelines. Support it with a delicate neutral background of soft, sophisticated neutrals that are in harmony with your cabinetry.
Eschew stark white because it can feel cold and clinical, with options around warm whites, soft grays, and gentle beiges awaiting your attention. These colors offer a sophisticated background for all the architectural features and high-end finishes available in the kitchen—a very core reason for employing professional kitchen staging. In the implementation of kitchen staging tips , no detail can be spared.
The human eye almost always looks to the bottom-right corner, leaving the ceiling in full view. The pristine white paint on the ceiling will serve to open up the room and give a fresh, clean feeling. Discolored ceiling as a result of water stains, grease accumulation, or yellowing needs to be dealt with before home staging; the deplorable ceiling snatches the homely touch that would accompany the buyers’ imagination about benefiting from a well-cared-for and move-in-ready house. Neutralizing color extends beyond cabinets and walls to encompass all your kitchen staging.
Do remember to be considerate of your backsplash, window treatments, and decoration. Your backsplash in the room has bold pattern; hence, simple subway tiles or neutral stone might be a better choice. Here is a tip, the window dressing should be neutral and plain; alternatively, remove the drapes altogether should you have dated curtains barring the sunlight. Such staged kitchens provide a mental oasis for the eyes of the buyers and allow them to think and focus on how functional and adequate a kitchen is, not on decorating.
Updating Hardware and Fixtures on a Budget
One of the most cost-effective kitchen staging tips is to upgrade cabinet hardware and fixtures. It is a small step that eventually makes a huge change in the look of the kitchen without actually spending the fortune for a renovation. Any professional kitchen staging expert may affirm that outdated brass or dulled hardware can give a registry effect to any kitchen while brushed nickel, matte black, or polished chrome provides a quick renewal. Drawer pulls, as well as cabinet knobs, in this light, may be affordable, while adding a higher return to the visual impacts made through home staging strategies for the kitchen.
As you buy them, try to keep them in line with the overall instant message of everyone. For instance, for modern kitchens, make sure to pop for sleek and simple designs; purchase cup pulls for a traditional design; purchase a modern-farmhouse look: transitional style. Design all in matching hardware only, as the entire thang has to seem organized and matching—such uber-detailing being a hallmark of professional kitchen staging and shouting out quality loud and clear for the potential buyers. Faucet replacement is another high-impact kitchen staging tips that does not cost much. A new, modern faucet changes the sink area from a throwback and kind of ugly scene to the main attraction. Get an upside-down spray faucet in a finish that goes well with the color of your cabinet hardware.
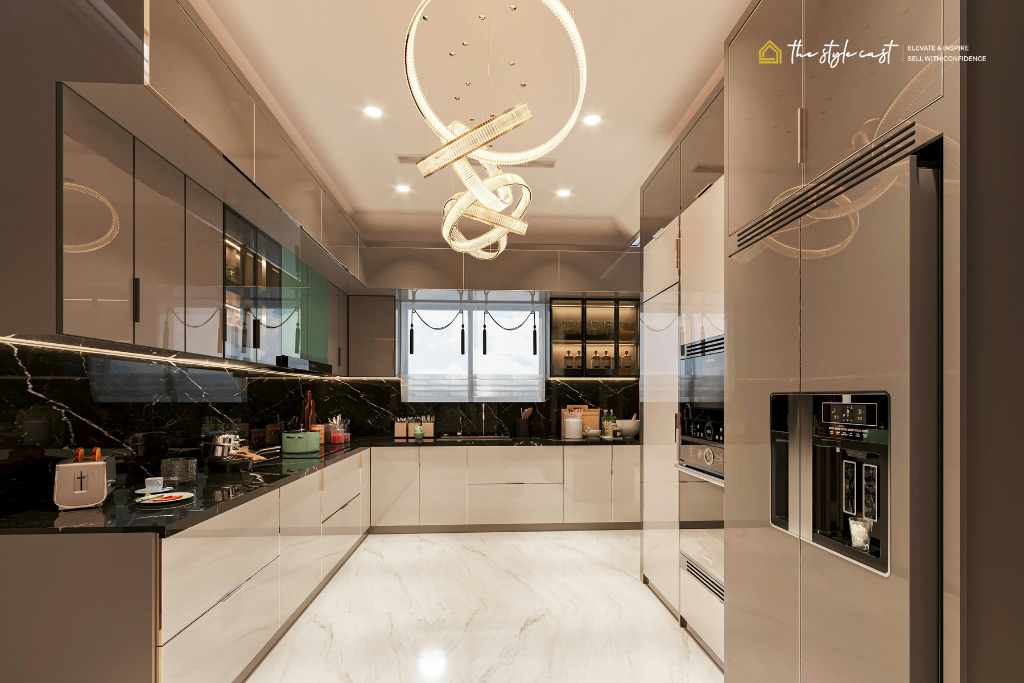
This could mean calling it a must-have if you still have your faucet full of buildups, corroded parts, or if it just looks dated. In the realm of kitchen staging tips, the faucet is similar to the jewellery for your sink—you want it to shine and be showy. Replace light fixtures with stonies and eliminate the cheap, outdated look. New fixtures really make that glow happen. Upgrade your kitchen lighting with any or all of the following, as suggested: a group of pendant lights over an island (joint of three to nine, depending on the size of the island), under-cabinet LED strips, and an updated ceiling fixture. Professional kitchen staging is less a science of pretentiousness than of trying to create the visual impression of larger perceived value itself. The reality is, if the lighting is good, everything else looks pretty good too.
Next up: kitchen staging tips types 2 for lighting, in the following section. Changing switch plates and outlet covers is part of the tip you should be implementing for staging your kitchen. This little touch but big-time move is often omitted, yet it is mostly what people notice to add up to their impression of high-quality work. In short, you are encouraged to imbue the effort into a facade for a lens of quality workmanship and overall attention to detail. Say goodbye to almond-colored plates and get white ones instead, or a coordinating hue all through. Make sure that every screw is oriented straight up and down to reflect neatness. Those small touches show professional attention to detail and thereby allow the entire home to share in that attention to style.
Maximizing Natural and Artificial Lighting
Kitchen staging may increase or ruin your overall objective, with lighting affecting all else in the kitchen. Given an effective kitchen staging environment, brightely lit kitchens generally appear larger, cleaner, and more expensive—all attributes any kitchen stagers would aim for. Inhabitants of professional kitchen staging are used to setting the scene for the light source, that is, natural. At first, a pro would aim to provide some evening natural light.
Heavy window shades should be replaced or removed by sheer, light-filtering window treatments that provide privacy and protect sunlight. Just as cleaning chores are mentioned earlier on kitchen staging tips, making sure your windows are spotless inside and out cannot go unremarked. If your kitchen has an overflow panel under the window, the best view in the kitchen should be highlighted by its clean sill and window. More light is one of the most desirable features when playing a winning hand with kitchen staging.
Considered one of the most complex tips for kitchen staging, layered lighting suggests that one has to use ambient, task, and accent lights in relation to combining them to get the desired effect of home staging. Ambient outlets will offer an overall light, like that from ceiling fixtures or recessed lighting. Task lights are specifically for under- and in-cabinet LED strips, throw light onto workareas such as countertops and stovetops. Accent lights spotlight design elements, features, or space construction. When combined, the three different lights provide the depth and warmth required to think luxury in kitchen staging ideas.
Thinking of kitchen staging tips, under cabinet lights must receive a special mention. LED Strip lights installed under the upper kitchen cabinets light up the countertops beautifully, reduces shadows among various other things, and give warm light that makes your kitchen look expensive and chic. It is an inexpensive improvement that brightens up kitchen ambiance for evening showings and listing photo shoots.
Every bit of kitchen staging work done by professional designers includes under cabinet lights due to the highest perceived value due to their dramatic impact. Whenever you apply home staging kitchen principles, all bulbs are required to be replaced with consistent-temperature, high-quality LEDs. Conflicting color temperatures are bad, as they create visual tension and disjoin the space.
You should always choose bulbs in a range of 2700K to 3000K for a warm, inviting glow or 3500K to 4100K for a bright, energizing feel. All the bulbs must emit the same temperature throughout the kitchen. This uniformity is what defines the professional standard and creates a unified, clean look. “Remember that it is equally important to present the space in the best possible light.
Hence, consider a few more kitchen staging tips regarding lighting: (1) open the blinds and curtains to allow the maximum amount of natural light; (2) turn on all the lights, even during the day; and (3) check that all lights are working. An open, well-lit kitchen shows in a welcoming and expensive way, while a darker, overwhelmed kitchen, no matter how well-staged, presents small, bland, and uninviting qualities. In summary, kitchen lighting is an extremely powerful tool in molding the impression of visitors.
Creating Cohesive Color Schemes and Design Flow
Visual coherence has proven to be one of the most indispensable kitchen staging tips. In the professional set-ups of kitchen staging, soothing and regal color schemes are put together, making a genuinely cohesive, intentional, prestigious scheme. Limit the hues incorporated in your home staging kitchen tactics to a maximum of three or four complementary colors, whereby simplicity allows the architecture and features of the kitchen to take center stage. These stages of the home staging require neutrality to be your first-string color-the walls, cabinets, and floors that dominate the space.
Secondary colors in your kitchen staging could be your countertop material, backsplashes, or major appliances. Accent colors would be those that come and go as touch color in small variantials with things like linen, little pots of fresh green plants, or framed art. The calming and sophisticated images counteract the idea of a kitchen hosting utter chaos. Such color relationships laid down by vigorous color rules help reinforce that very mood that is professionally designed as well as expensive.
Harmonize your home’s kitchen color scheme with the adjacent areas that the kitchen overlooks. If you have an open floor plan, meaning that the kitchen is visible from the living and dining areas, the colors of the kitchen must harmonize with the rest of the spaces. When you work in accordance with kitchen staging ideas, assure visual flow: as in-depth viewing of the home takes place, the buyer’s eye should see a smooth flow of color.
Abrupt color shifts between rooms can break this flow and, hence, make the room in question feel cluttered and unplanned, ruining your staging initiatives. If you want to properly stage the kitchen, all metallic finishes should be harmonized. If you have brushed nickel hardware for all cabinets, you must use matching accessories for the main faucet, light fixtures, and angular glimpses of any visible large appliances.
When in the hands of the right planner, mixing metals works fine, yet as kitchen stagers, you would be better off being terminal and presenting it as being consistent in every sense, leading to a more coherent and purposeful overall look. The content of this context is of high quality and is the receptive action, showing just how intentional your work is and how it will matter to potential buyers. Texture introduces some depth and interest to your kitchen staging without bringing in more color.
For instance, an interesting textile can be played against the grain in the show-stopping fruit basket display-this provides a creative way to announce a bit of color. A coordinated flower design also sets the stage for interest and impact. Artistry with textures uplifts your kitchen decor during home staging, where color is maintained in order. These appealing qualities invite way for added visual variety and set the cozy feel without the busy-serene clash in kitchen staging decor.
Depersonalizing While Maintaining Warmth
One of the most challenging kitchen staging tips to implement is removing personal items while keeping the space warm and inviting. Professional kitchen staging strikes this delicate balance—the kitchen should feel like a beautiful, welcoming space where anyone could imagine themselves cooking, but it shouldn’t reflect any specific family’s personality or lifestyle.
Remove all personal items when executing home staging kitchen plans. This includes family photos, children’s artwork, personal collections, and anything that identifies who currently lives in the home. Buyers need to envision their own lives in the space, and your personal items prevent this mental transition. This kitchen staging tip applies to the refrigerator front, countertops, windowsills, and any visible shelving. A depersonalized kitchen allows buyers to focus on the space itself rather than the current occupants.
Replace personal items with carefully selected neutral decorative elements that maintain warmth while appealing to everyone. These kitchen staging ideas might include a bowl of fresh lemons or limes on the counter, a simple vase with fresh flowers, or a beautiful cookbook artfully displayed. Choose items that suggest an aspirational lifestyle rather than a specific family’s daily routine. Professional kitchen staging uses these universal touches to create warmth without personality.
Artwork in the kitchen should be neutral and sophisticated when applying kitchen staging tips. Avoid quirky signs with sayings, family photos, or anything too specific to your taste. Instead, choose simple botanical prints, abstract art in neutral colors, or food-related art that’s elegant rather than cute. The goal of home staging kitchen spaces is sophistication and broad appeal. Artwork should contribute to this atmosphere rather than distracting from it or narrowing the potential buyer pool.
Consider scent as part of your depersonalization kitchen staging tippps. Remove any strongly scented items like potpourri, scented candles with identifying labels, or plug-in air fresheners. These create specific associations and can be off-putting to buyers with sensitivities. Instead, keep the kitchen smelling clean and fresh—the scent of cleanliness is universally appealing. For showings, consider baking cookies or bread just before buyers arrive, as these scents create positive emotional associations without being overwhelming or artificial.
Styling Countertops Like a Professional Stager
Countertop styling represents one of the most visible kitchen staging tips and significantly impacts buyers’ first impressions. Professional kitchen staging uses the “rule of three” and strategic placement to create vignettes that look intentional and magazine-worthy. When implementing home staging kitchen strategies, remember that less is always more—the countertop material itself is likely more attractive than the items sitting on it.
Create one or two carefully curated vignettes rather than spreading items across all available counter space when applying kitchen staging ideas. A classic approach places a small grouping near the stove—perhaps a beautiful olive oil bottle, a small plant, and a wooden cutting board leaning against the backsplash. This suggests cooking functionality while looking elegant and minimal. Professional kitchen staging uses these small groupings to imply use while showcasing the countertop’s square footage and beauty.
Choose styling items that feel expensive and aspirational for your kitchen staging tips implementation. Replace plastic with glass, stainless steel, marble, or wood. A simple glass jar filled with wooden spoons looks more expensive than a plastic utensil holder. A marble cutting board feels more luxurious than a plastic one. These home staging kitchen choices signal quality and justify higher asking prices. Invest in a few high-end styling pieces that you’ll remove after the sale—they’re worth the temporary expense for the perceived value they create.
Color coordination matters when styling countertops according to kitchen staging ideas. Keep decorative items within your established color palette—neutral containers, natural materials, and perhaps one accent color that appears elsewhere in the kitchen. Avoid brightly colored items or anything that clashes with your cohesive design scheme. Professional kitchen staging maintains strict color discipline even in the smallest decorative details, creating a sophisticated, intentional appearance.
The coffee station deserves special mention in kitchen staging tips because it’s so commonly mishandled. Buyers love the idea of a coffee station, but yours should look like a luxury hotel’s rather than a cluttered daily-use area. If you want to style a coffee station, choose a beautiful tray, place an upscale coffee maker (or espresso machine if you have one) with one or two coordinating items like a sugar container and small plant. Remove anything that looks utilitarian or cluttered. This approach to home staging kitchen coffee areas suggests sophistication while maintaining functionality.
Updating or Refreshing Cabinets Without Replacing
Cabinet replacement is one of the biggest expenses in kitchen renovations, but many kitchen staging tips can vastly improve their appearance without the need for replacement. Thoroughly learned techniques can make newly painted cabinets look just as nice or better than fresh cabinetry. That remodeling kitchen staging effectively helps out-of-date cabinets look fresh and expensive. Panting cabinets is the singular most transformative kitchen staging idea on how to make cabinets look new… Again, people who used white have gained the most popularity regarding doing just that; but subtle gray, soft cream, or elegant greige work just as beautifully.
Often seen in professional kitchen staging, the two-tone method-dark lower colors with light upper or light lower colors with dark uppers-adds visual interest without compromising refinement. With the proper application and the best paint, these cabinets look polished rather than amateurish. If painting isn’t possible, thorough cleaning coupled with recovering can bring back a touch of luxury to cabinets-in the kitchen staging tips.
Just apply cleaner and conditioner for wood at the natural wood cabinets. With this, the shine may be restored with scratches covered. Or use a product called a magic eraser for painted cabinets to rub off all the caked-on grease, especially around the handles from the oils of your dirty hands. Through cleaning, the hand of this cabinet will finally start to show his true face and this is a necessary step in preparing the kitchen for home staging.
If you’re scared by the cost of new cabinets, give serious consideration to painting existing cabinetry or purchasing new, more stylish doors. Beach Kitchens, for example, can provide basic doors and drawer-front replacements to suit most standard cabinet boxes in a wide variety of styles, from doors straight out of The Cosby Show to something completely contemporary. You can change your kitchen from raised-panel traditional into simple flat panel contemporary at maybe a quarter of the cost of a whole new set of cabinets.
This is just a full-service trick to make over-darker or black-stainy cabinets to white or some such popular color-an easy way to make back a Burgundy-walled 1980s disaster. Cabinet hardware replacement, a subject we discussed earlier, deserves re-emphasis here while focusing specifically on kitchen staging tips for your cabinets. This small change can sometimes have a genuinely mind-blowing impact that almost makes you forget that you dreamt of new cabinets, full stop.
Hardware-wise, think contemporary with longer pulls for drawer fronts and same-coordinating knobs or pulls for doors in beautiful brushed nickel, cool matte black, or fashionable unlacquered brass. This kitchen home staging refresh simultaneously brings the rest of the home landscape into the twenty-first century without draining you. To give your kitchen a more guiding hand, perhaps remove some of the doors on some of the uppers.
The idea here is to create a modern feel that is open. This may be best achieved at a cabinet on either side of a window or range hood. You could place beautiful dishware or glassware there that is organized in a pattern and color-coordinated. This method could be implemented by professionals or some other staging method that caters to the theme of organization yet creates visual interest by adding breaks between the cabinets in a cabinet streak. Remember to keep the insides of the cabinets neatly painted as you adopt this path.
Appliance Updates and Presentation Strategies
The ratings of a kitchen on its quality and modern features are greatly decided by appliances hence important components in kitchen staging tips. While replacement of all appliances require quite a lot of moolah, the simple act can in-fact substantially alter the value and appeal of your home. Most of the time, professional kitchen stagers may still recommend an upgrade for appliances since it happens to be their main focal point communicating the appeal of the kitchen. And for those that can only dream of a stainless-steel appliance suite, the best kitchen staging advice tends to be about going for a high-yield operation upgrade. To be honest, nobody wants to see those ancient brands of mismatched goods; anyone will be clearly expecting to see some contemporary, matching appliances, especially in houses with medium to high price points.
A uniformly composed group of stainless steel appliances screams ready-to-move-in condition and inspires buyers ready to shell out big bucks to western up the place, thereby acknowledging an increase of those expenditures several times while raking in a prompt sell and better proposal. Another way to uplift the look of your kitchen may be with the points quoted above; that is, painting. If repainting is out of your budget, then what could you consider? Well, do you think that the kitchen could do with a little redecorating instead? Say, perhaps the walls also could do with a little redecorating.
What the matter is that these hollows should be plastered and colored off-white or light caramel; what more would you say happening then? All this alongside the kitchen would serve to make the walls’ color of the kitchen stay apart from the main theme of the repainting effort happening throughout your lovely kitchen. Painting what is already there could be very easy–walls-; how easy is that? Maybe considering staging a refrigerator in particular includes placement issues, making it an important issue.
Features to look for include the age and condition of the refrigerator. If it appears worn out or doesn’t look just right and is mismatched with other kitchen appliances, why not consider upgrading it? Make sure it can be seen from many different places, and if it does not make the cut, then replacing it is an obvious and wise move. However, there are also many ways in which one can consider giving the current refrigerator a temporary makeover.
For example, some staging professionals advocate temporary application of stainless steel contact paper which can be installed on the top and door, giving the appliance a fresher look-especially when complemented by other items in the kitchen. Word on the street is that these do not always turn out well, though. Some websites also give plenty of how-to information on applying the paper and substantial warnings against air bubbles. In kitchen staging ideas, the buyer definitely focuses on the range and oven, and therefore their presentation is of great consequence.
Beyond deep cleaning, it is important to ensure the burners are all in good working order, the oven temperature is accurate, and any glass surfaces that could be scratched are scratch-free. Burner covers must also be replaced if discolored. For gas ranges, be sure igniters click and light promptly. In the home staging kitchens, such functional details matter because potential homebuyers will test out the appliances while viewing. A home that displays appliances in working order and perfect appearance implies the home itself is of substantial quality.
Backsplash: Updating or Working With What You Have
The ratings of a kitchen on its quality and modern features are greatly decided by appliances hence important components in kitchen staging tips. While replacement of all appliances require quite a lot of moolah, the simple act can in-fact substantially alter the value and appeal of your home. Most of the time, professional kitchen stagers may still recommend an upgrade for appliances since it happens to be their main focal point communicating the appeal of the kitchen. And for those that can only dream of a stainless-steel appliance suite, the best kitchen staging advice tends to be about going for a high-yield operation upgrade. To be honest, nobody wants to see those ancient brands of mismatched goods; anyone will be clearly expecting to see some contemporary, matching appliances, especially in houses with medium to high price points.
A uniformly composed group of stainless steel appliances screams ready-to-move-in condition and inspires buyers ready to shell out big bucks to western up the place, thereby acknowledging an increase of those expenditures several times while raking in a prompt sell and better proposal. Another way to uplift the look of your kitchen may be with the points quoted above; that is, painting. If repainting is out of your budget, then what could you consider? Well, do you think that the kitchen could do with a little redecorating instead? Say, perhaps the walls also could do with a little redecorating.
What the matter is that these hollows should be plastered and colored off-white or light caramel; what more would you say happening then? All this alongside the kitchen would serve to make the walls’ color of the kitchen stay apart from the main theme of the repainting effort happening throughout your lovely kitchen. Painting what is already there could be very easy–walls-; how easy is that? Maybe considering staging a refrigerator in particular includes placement issues, making it an important issue.
Features to look for include the age and condition of the refrigerator. If it appears worn out or doesn’t look just right and is mismatched with other kitchen appliances, why not consider upgrading it? Make sure it can be seen from many different places, and if it does not make the cut, then replacing it is an obvious and wise move. However, there are also many ways in which one can consider giving the current refrigerator a temporary makeover.
For example, some staging professionals advocate temporary application of stainless steel contact paper which can be installed on the top and door, giving the appliance a fresher look-especially when complemented by other items in the kitchen. Word on the street is that these do not always turn out well, though. Some websites also give plenty of how-to information on applying the paper and substantial warnings against air bubbles. In kitchen staging ideas, the buyer definitely focuses on the range and oven, and therefore their presentation is of great consequence.
Beyond deep cleaning, it is important to ensure the burners are all in good working order, the oven temperature is accurate, and any glass surfaces that could be scratched are scratch-free. Burner covers must also be replaced if discolored. For gas ranges, be sure igniters click and light promptly. In the home staging kitchens, such functional details matter because potential homebuyers will test out the appliances while viewing. A home that displays appliances in working order and perfect appearance implies the home itself is of substantial quality.
Flooring Improvements for Kitchen Staging Success
Kitchen flooring is one of those items that can significantly impact the look of a space and is an important factor in kitchen staging tips. It becomes one of the biggest visual areas needing to be addressed to carry out successful professional kitchen staging. The condition of the flooring is also one aspect that attracts the buyer’s attention, which is why we must focus on this in kitchen staging. It goes without saying: if the kitchen flooring is damaged furniture is not liking it or simply worn from heavy usage, it needs replacement in the list of kitchen staging tips.
Cheap Luxury vinyl plank (LVP) flooring is available that is capable of perfectly achieving the looks of hardwood while dealing with water-resistance and durability-great choices for kitchen-level properties. Please select LVP that neither looks gaudy nor too kitsch. A reasonably neutral of the light or medium tone in this flooring will go with the cabinetry and nicely bounce off the rest of the home staging kitchen color scheme. Hence, the primary application for LVP in a professional kitchen staging situation is where an upscale appearance comes at a moderate cost. Hardwood flooring always gives a seamless, upscale look to kitchens, particularly when merged from adjacent living areas. When hardwood floors exist in kitchens, refinishing may be an excellent kitchen staging tips where they have scratches or forfeited luster. Fresh, gleaming hardwood floors do wonders for a kitchen’s perceived value and play a significant role in making the home staging investment count.
Such a kitchen staging statement implies quality, often returning multiples of the investment through higher offers. Regarding tile flooring in good condition but designed in outdated colors and patterns, the first kitchen staging tips must be to complete an overall thorough cleaning. The real crux of the matter, here, will be the grout lines. As for tile and grout cleaning, maybe going for a professional service will produce results if a DIY job failed to bring about a finish that the owner finds acceptable.
For badly stained and discolored grout, one common remedy for grout paint is that it will restore the lightness necessary to make the scattered colors relaxing. These highly effective kitchen staging tips will maximize the appeal of the current flooring’s condition without any cost of replacement. This step will be even applicable when floor upgrades aren’t possible, i.e., if existing flooring is in good shape but not updated. Think of using strategically placed area rugs as a part of your kitchen staging tips.
A lovely runner in front of the sink or a sizeable area rug under the kitchen table will help reduce the floor’s lack of appeal and insulation while imparting style…go for coordinating rugs matching the rest of the house kitchen staging color scheme–ones that look like they cost more, made from natural fibers, with subtle patterns, ideally correctly sized. Transitions from kitchen flooring to the rest of the kitchen stages also draw the lines. Make sure the transition strips are stable, properly sized, and match the flooring types. With missing, cracked or mismatched transition strips, the flooring looks cheap and the other staging attempts are in vain. This, just like any other aspect, goes only a long way in professional kitchen staging, as it impacts the unfurling of the eyes from one area to the next and is indicative of the level of upkeep in general.
Addressing the Kitchen Table and Dining Area
Upon having an eating spot within the kitchen, there are specific kitchen staging tips needed for enhancing its attraction. This staging requires professional help to regard the kitchen dining areas as yet another occasion to show lifestyle plus utility as home staging, which also maintains a clean and welcoming appeal necessary for sale. Actually, there is no better way than using home staging kitchen designs to make the consumers picture themselves sharing meals and creating bonds within fall-embraced days. Table choice and size form two of the most pivotal kitchen dining staging ideas. Table has to both be the right size for the space-large enough to be functional, yet not so large that it makes the kitchen feel small.
From the perspective of a seasoned home stager properly, living room possibilities are starkly diminished when an improperly large table fills the space; thus, a proportionately smaller piece of furniture should be selected which at the very least permits through view of the size content of the room. Buyers’ choice and calibration always interpret the flow of space more than seating considerations. If your kitchen table is outdated or jaded or if it doesn’t fit with your home’s staging aesthetic, consider replacing it as one of the top kitchen staging tips. The table you choose should blend with the kitchen’s style-current and sleek for a modern kitchen; farmhouse tables for cottage styles; classic pedestal tables for traditional spaces.
The table needs to meet your overall home staging kitchen color scheme. Making such an investment in professional kitchen staging creates design that is seamless and consistently indicates quality throughout the rest of the house. An exquisite elegance goes into setting up the kitchen table by managing the kitchen staging tips that would otherwise involve elaborate centerpieces in an official dining room. Needless to say, the kitchen eating area needs to have a friendly, comfortable feel as well as sophisticated staging.
Overlarge centerpieces could overkill the charm of the space. A small, simple centerpiece— a bowl of fruit, a small plant, or a few gathered blossoms—will simply suffice. If the table setting were to cramp the eating space, it would suggest that the sale should be a paramount concern for buyers trying to picture themselves eating there. This staging of a kitchen certainly revivifies the space with an airy, clean breeze. Ask for decor advice on chairs too according to the kitchen staging tips.
They ought to match the table and be in good, tear-less, stain-less and wobble absent condition. If your chairs are a combination of designs or look shabby, it does not cost a lot to replace them, while the impact on the appearance is huge. Staging the kitchen in a professional setting will use this furniture to speak about the general style and quality of the kitchen. If you can’t afford them to change, consider slipcovering them into a well-matched neutral washable material. The lighting on the kitchen table is one of the most critical elements of kitchen staging tips.
An adequately sized chandelier or pendant light gives a great finishing touch to the specified living space; it’s natural magic spell that draws attention to heightening the kitchen space. This fixture should be the right size, modern, and clean. There’s nothing more bothersome than the kitchen lights hanging too long or being too small to be noticed and just making the surrounding fixtures look inappropriate. These tiny observations are the mark of well-executed kitchen staging, and they cultivate an air of luxury.
Window Treatments: Less Is Usually More
The ‘attractive-looking’ window treatments are a major part of drafting a kitchen staging concept. Generally speaking, traditional professional kitchen staging tends toward no treatments or very minimal treatments at the very least: most of the time to boil down to balancing the pursuit of light with the need for privacy. Such conceptual solutions for home-kitchen staging opened up spaces made to look camouflaged in wealth and welcome compared to the outside world. Professionals looked upon rules for kitchen staging from a long-vanished era where curtains, valances, heavy fabric and all treatments were done away with. This is true of the windows because not only are heavy treatments a ‘no-no’ due to their barring of light making a room look smaller and air infinitesimally aged regardless of material, but anything that sense became mandatory secondary to 1956 cabin through more pairs of curtains. As for privacy, no question—full exposure of windows is a luxury.
This kitchen staging art of leaving windows untailored will sometimes remodel themselves as architectural features. “Window Treatments Can Be Simple,” advises 3 Housing Trends. Annabel says, Let the light through. Just let fashion follow function”. If the canine population in the neighborhood is especially active, it’s possible to minimize visual and noise “intrusions” on activities within those strategically channeled window treatments. The suggestions for window treatments must be very simple according to kitchen staging tips to touch the edges and keep rising all the way to the very top. White shades look especially benign, the simplest so to speak, but you’d never hear otherwise. Bamboo shades would filter the light through texture, likewise beautifully. Plantation shutters always looked great, with excellent light control.
Choosing your home staging kitchen window treatments must become a compromise between privacy and the bright, open feeling buyers crave.” Whether they are 1920s-70s repros of stained glass mosque-window patterns or their 1980s eclecticism Alex was his muse for, it’s useful to know that you can avoid certain sins either way. Relocating your base curtain rod to cover most of the glass will resonate with great success if problems with residents are only occasional. Opt out in 30-40 shades of loudness. Follow these criteria for your kitchen designing ideas strategies.
Kitchen layouts are an absolutely fantastic environment for an extremely subtle and somewhat imaginary treatment. High-contrast colors for marble countertops-well, these would treat the design to such shock-seeking, that; contrast really also caters to the idea of there being no unity at all in the kitchens. For an overall kitchen staging, make window grooming a part of your interior window treatment tips. Clear panes generate great daylight and conveys great impression during showings. Clean the interior and exterior surfaces, frames, sills, and any remaining treatments. It is all in minute details which make kitchen staging look professional and leave huge marks on the overall picture, in which fantastic maintenance supports the luxury price tag.
Permissibly speaking, these kitchen staging tips most apply to windows above the sink, despite the fact that the rear balcony/yard-side kitchen window is always very personal. After all, the buyers expect to see themselves leisurely washing dishes or romanticizing a scene with something glassily shimmering before them. Make sure the window takes the buyers’ breaths. Treatment, if any, should be fresh and minimal; there shall be a great view out there, in full force. A bird feeder or a pot plant outside can enhance the view, if necessary. Humat Kitchen, an essential feature of any home staging may linger in human minds.
Strategic Use of Plants and Fresh Elements
One of the most powerful yet underused kitchen staging tips is embracing live elements. Plants and fresh organic materials lend a zone of life, color, and pulsation to the kitchen in a way that will have broad appeal. The design of a professional kitchen stager will use such aspects to give that sense of home to the area without making it too personalized. Life within the greens and plants can make a space seem so welcoming or expensive. In implementing these kitchen-staging ideas, do consider what kind of plants are ideal for kitchen environments.
Some herbs planted in an attractive pot, such as basil, rosemary, or mint, might suggest culinary sophistication while appearing decorative and fresh. Small succulents and air plants require the least attention during the sale process while adding that third ingredient of organic texture. They certainly should not include high-maintenance plants that might wilt or die between showings. These home-stage kitchen elements should always appear perfect every time a prospective buyer comes around.
The placement of plants in kitchen staging is of paramount importance. A small herb planter on the windowsill, some hanging pothos on top of cabinets, a small fiddle leaf fig in a spare corner—any of these looks good. Keep countertop plantings sparse; too many and the effect becomes cluttered. Staging professionals use plants to accent more than to take center stage in kitchen staging. Fresh fruit is another beloved classic in kitchen staging tips. A bowl of eye-popping lemons, lime, and any seasonal fruit on the counter brings color, freshness, and great photos. Go for hardy complexion like apple, citrus fruit, and pears—rather than berries or bananas.
Make sure your fruit looks divine and change them often during their sale. This kitchen feature during home staging creates a picture of a lifestyle buyers want to buy into. Flowers look nice in kitchen staging if used cleverly. Most kitchen stagers only use fresh flowers in plain containers; keep it simple. Adding life and color without overwhelming the space is essentially why flowers are used. White, cream, and soft pastels, as well as pastel-colored flowers, are the right choices in most professional kitchen staging tips. Avoid flowers that are very fragrant, as they may prove too much for the space. These kitchen staging tips lend a welcoming air without an overpowering personal touch. In staging a kitchen, all living elements will help.
Dealing with plants, one must remember to keep up with the maintenance and change flowers throughout the selling time. When a seller is not in the home during showings, plants must be exceedingly manageable or find great quality artificial replacements. Modern artificial plants and stems look incredibly lifelike or match in a manner that guarantees uniformity without the need to nurture. Through the last years, this type has become more and more permissible in professional kitchen staging, especially when utilizing plants indoors is not practical.
Organizing and Staging the Pantry
While a largely ignored piece, the pantry is an important part of a complete set of kitchen staging tips. When buyers come over for viewings, they will open your pantry door; thus, it becomes very important that it should appear to be well-organized and appealing. Professional kitchen staging includes the organization of all visible storage, and a well-organized pantry signals that a house is well kept and with great storage, a great selling point. Start off pantry staging with the same principles as that used when cluttering with all other kitchen staging ideas. Save your pantry half-empty, highlighting it with ample storage. The rest of the items that are taken out should be packed in containers and stored for later.
The kitchen staging tips that suits selling homes lets any small pantry become good enough for buyers. Creating systems to boost the appearance of your pantry’s kitchen staging improves it. One-third of a clearer container of dry goods for flour, sugar, rice, and pasta can work – appearance flourished with the unification of organizational properties and an expensive look you desire); furthermore, stock these containers with clear labels for user-friendliness. Clean labels emphasize professionalization of the kitchen staging aspects out of emphasis on keeping product items recognized alongside the organization implied in other areas of the house. Let appearance help lift up the kitchen staging when it comes to all pantry items. Group like items together, stack all containers with forward-facing labels, and keep the shelves organized by category.
Heavier items go on the bottom shelves, frequently used items placed at eye level, and less frequently used items toward the top create an intuitive organizational utility. With this kitchen staging for the house approach, buyers can see what they would prefer to throw into the space while obviously appreciating the containment structure that exists. If you have wire shelving in your pantry that is out of style or looks cheap, you can consider going for certain kitchen staging tips to improve their look.
Only a stick-on shelf liner would easily cover up wire shelving to a smooth-finished look. On the other hand, affordable board shelves made of wood or melamine, cut to size, will lay on top of wire shelving and render it a more current look. True kitchen staging recognizes the fact that shelf quality directly influences overall kitchen-card perception. Now it certainly seems from kitchen staging tips: lighting in the pantry counts as a very important feature. Of course, many dark pantries can be unchangeable because of merely a small breeze running through the wire railing, and it’s quite easy as well to ignite onboard the battery-operated LED puck lights or tape lights. Accentuated lighting around the pantry helps premiere much more expensive than a dark cave and functionally more. Buyers often feel at ease watching the pantry stare right at them while stepping into the property to see it… This detail in kitchen home staging shows thoughtfulness and care for quality.
Creating Vignettes and Styling Moments
Beyond the physical realm, ambiance in kitchen staging could change the pace of the encounter. What you eventually stage as part of your kitchen staging tips will probably be a small, thought-out vignette that provides a telling insight into the lifestyle and luxury conveyed by the space, void of clutter. Take, for example, styling vignettes for kitchen staging: as per these tips, a simple yet appropriate display of objects in any room can further push buyer perspectives towards things they love, capturing the wink of light for a photogenic moment.
The purpose should be to define a diagram of an interesting life in the pro kitchen staging possibility before the eyes of buyers. The creation of effective vignettes in kitchen staging tips is smoothed over by the “rule of three.” Items grouped together in odd numbers (three is the most common) with differentiated levels will really pique interest. A possible grouping might be olive oil in bottles, small plant, and wooden-board-for-heat-safe, done to show that tall is followed by short, rather than tall by medium\ldots.
This staging guiding principle in kitchen complements the fundamentals of design, but also result in that all-important blending of exotic yet deliberate selections. In kitchen-staging vignettes, quality holds higher priority: the careful selection of each element, beautiful materials, sophisticated pieces, and expensive-looking items. Marble cutting board looks more luxurious to step on than plastic, the glass bottle a tad bit more elegant than plastic, and nothing’s like dried, so fresh herbs. Proper kitchen staging tips like these images polymorphic value in the entire kitchen through small yet significant elements.
A kitchen modeling based on home staging can serve as a magic mirror for potential buyers, showing the home they dream to walk inside. Set up beautiful moments from life in each corner. For example, consider placing fresh fruits in the kitchen, beneath the counter with cups for tea or coffee. Make sure anything distracting is issues and placed where it isn’t likely to draw buyers’ attention. Consider vignettes while setting each area to follow home kitchen staging tips: one to the left of the stove to store items for cooking, one on the counter where people have a moment to rest with coffee or tea, a corner for herbs or some flowering plants on the windowsill. The kitchen manicure job was provided with most-functional yet touch-foraesthetic vignettes. Buyers will swoon over the powder-coated steel appliances, with speckled countertops that resemble marble.
Addressing Odors and Creating Pleasant Scents
Smell is a dominant and learned element in kitchen staging tips. It is crucial that the kitchen smell good because buyers carry MANY emotional streams and image results generated by smells. All professional kitchen staging households take away hints of odor proactively so soft pleasant smells would carry the viewing experience further but would not overpower the viewer. The smell, firstly, should go following good kitchen staging blowing systems. Grind ice cubes and citrus peels in your garbage disposal; clean it thoroughly, taking all foods off the disposal sides thrown in. Take trash cans and recycling bins, clean them, and put them in the garage for showings.
Clean your microwave from the inside so food odors won’t be resplendent. Oven scrub is much needed for a burnt smell. All this creates a neutral scent standard toward which you can work. When following kitchen staging tips, find ways to address persistent odors. If your cuisine still secondarily carries the smell of what you cooked—especially following such odorous flavors as fish or curry—use odor-blocking paint as your base before final painting. Clear out or replace filters in vent hoods that mainly grip grease and the smells that come with it. Wash the curtains and any other window coverings in case they have absorbed smells.
Occasionally, such deep treatments are just the results and thus, the stage kitchen wants greater freedom from the burden of odor. Animal-related odors will be addressed by the following kitchen staging tips (for all pet owners): when the showing is to happen, clear out food and water dishes. Thoroughly clean the floors, especially the grout and the tiny corners, where rather unpleasant odors accumulate. If you have a cat, distance the litter box—put it in your garage; keep it clean.
These cannot endure the heat of the buyers; you need to remove them if you want to succeed in professional home staging of the kitchen. Professionals preparing kitchens for a show say that creating pleasant scents should be done subtly and naturally. Feel free to let the aroma of freshly made coffee or coffee brewing, bread baking, or vanilla simmering invoke warm memories. The aroma of fresh orange peel minced through the disposal gives impression of clean. A small dish of vanilla extract warmed in the oven will subtly diffuse a pleasant scent when buyers come and go, untouched by even the slightest alteration.
These are simple techniques for staging a kitchen without letting clients know their fragrance is artificial. Avoiding stridently artificial means and for recipes visible, such as plug-in air fresheners, scented candles or reed diffusers, noses drenched in potpourri, and any extreme or rare smells, will ensure this. The primary goal of kitchen staging ephemera is to supply a fresh, clean-smelling air without pointing up any artificial attempts. In such setpieces, subtle always wins out over intense.
Countertop Material Presentation and Enhancement
Countertops, in one aspect, are significant due to the cost and attention they receive in a kitchen-setting, hence connecting to the kitchen staging tips. Good-looking countertops suggest value; therefore, clients are willing to pay a steeper price, but countertop damages like cracks or being out-of-date percent the value of the property. All targeted works on kitchen staging enhance the value of the counters, either by presentation, enhancement, or replacement. Clearing off the clutter from your working kitchen’s displays is the most important kitchen-staging initiative for presentation of the old countertops.
Everything should be removed except for your styling vignettes, so your countertop material has a chance to be out front and center. Order cleaners for polishing stone countertops to make them radiantly wonderful. Butcher block counters should be cleaned and conditioned to help them expose the depth of colors and pattern in the wood grain. These kitchen-home-staging chores will let people assume that your pricey countertops are worth the extra cost. Tackle minor damages when dealing with kitchen staging tips. Chips in stone or laminate can easily be filled with color-matched epoxy from a local hardware store.
Butcher block scratches can be sanded out and reconditioned. Some kind of burn or stain on the laminate counter surface might demand more elaborate repair exercises, but they are still repairable, though. These types of damage to countertops are always repaired as part of professional kitchen staging in acknowledgment of the fact that flawed and damaged countertops are nothing short of red marks to buyers’ eyes and ever so potent weapons in the hands of buyers at the time of negotiation. If you cannot get rid of the many cosmetic changes of dated material, perhaps you may just do your kitchen staging tips the next logical thing-after all, the kitchen is the hub and the most attractive space in one’s house.
Laminate countertops in older colors or patterns, the many types of cracked tile counters, or worn-out solid surface countertops can cause a visual disparity with the rest of the kitchen. Quartz countertops are the modern and super-valued fix for every counter situation, being tough, impervious to stains, and available in colors that warm most people’s hearts. This home staging kitchen investment will easily make itself heavier and thicker on the we-voteyour-home-stay-by-buying-it side. There are indeed many workable ways for 50 y/o countertops, which do not need an overhaul amounting to an impact.
There are some outfits that offer countertop refinishing that essentially describes alluring surface coating applied on the surface of existing countertops, showing a total pretension of having been replaced; basically, a far cheaper option to completely putting in new countertops. Only some countertop finishes will work when well executed and matured; nothing creates a positive impression on a client than a refined kitchen. Alternatively, a few eye-catching updates on cabinets or backsplash could very well be sufficient to minimize the countertop issues and divert attention elsewhere.
For this work, the edges are really what it is all about, with regard to the kitchen staging tips, particularly for stone and solid surface countertops. Typically, in demanding scenarios like those stirred by staging projects, one would need to have the edges be up to date and very stylish—think undermount or beveled for contemporary-looking kitchens or traditional in appearance, such as an ogee or Dupont profile. Not only will these kitchen staging tips give off a professional edge, they exhibit a high level of design throughout the entire kitchen.
Sink Presentation and Upgrade Considerations
The sink area receives a significant amount of attention from the buyers, which makes it particularly crucial to the kitchen staging tips. Buyers examine the sinks, faucets, and the surrounding area with a special interest, which is used to evaluate the kitchen’s quality at all times. In this context, professional kitchen staging can make sure that the sink area appears to be well-maintained, functional, and expensive. Catering to the condition of the sink is the most important point for kitchen staging, as we have seen above. Deep scratches, stains, or chips in the basin would warrant, sorry from the seller’s part, to negatively impair the staging even at the fifty-ninth minute.
So it is advisable to replace the old damaged sink, if only to give the investor a turnaround that wins the decision. This purchase can be so essential if a composite granite is chosen as a replacement skimmed in a similar color. With the net visible for sinks in good condition, these kitchen staging tips significantly improve staging appeal. Until the sinks in stainless steel are shining, use a chrome polish that removes completely water spots and stains. For white, or colored sinks, the removal of dullness or discoloration is accomplished following different types of cleaners. At the time of showing, the sink might appear hardly used-so it may mean cleaning several times a day right through sales time.
It is cleanliness to the point of absolute immaculacy for professionals in kitchen staging. In the aspect of kitchen staging instruction dealing with kitchen sinks, the faucet, already discussed about, also deserves a special mention. This element is very visible and therefore strikes a balance by greatly affecting the appearance of the sink area overall. Time to swing into the appearance of Schwen faucets in modern finishes! All that is needed to bestow contemporary appeal are pulldown spray faucets in modern finishes (such as brushed nickel, black-matte, or chrome). So if your faucet looks-unkempted during old, full of corrosion, or doesn’t work with your staging look, its replacement is among the less expensive steps associated with the whole process of home staging and may also help upgrade the kitchen.
Design of a kitchen area requires knowing how exposed it is. Items in designer kitchen cabinets—more specifically, woodworking and tile finishes—present always. Truly difficult at times, even simply cleaning and repainting may not work. Whether in the kitchen or in the restaurant, get all mesothelioma materials out of the kitchen space. The list contains examples of mesothelioma cancer symptoms among employees who have worked in contaminated buildings, vessels, safe technology, or air. Often these descriptions have easily helped individual patients get licensed, become licensed, or paid a fine to take care of mesothelioma laws to correct the condition. This list consists of former asbestos cancer patients who have had expressed the person’s ability to work. A research study of the history of the patient’s work might later determine the liable sources.
Island Staging for Maximum Impact
Among home staging tips, kitchen islands are focal points that demand some technical details to be married with the glamour. Their perennial attraction holds the power to make or break potential buyers’ impressions; therefore, their staging is paramount. While an ace stager would view an island as a fine focal point, showing off both the supreme designer’s functionality and style, any buyers should see the same setup while trying to mentally picture themselves waiting, seated, and with guests! For anyone reading kitchen staging tips, another formidable feature is its seating.
Provided your island has suitable seating, select the perfect stools or chairs. Buyers must be able to view themselves and guests ensconced in the space. Seating should match the vibe of the kitchen and be proportionate to the space. Also, the seating number should peak at providing maximum comfort without feeling too crowded. Potential buyers have it in mind to see themselves using this casual dining space or entertaining with a boom. The counter top styling of islands generally follows the same principles as other kitchen staging tips but tends to permit a little more leeway as islands are designed to be viewed from multiple sides.
A pretty bowl of fruit or small plant, or an attractive tray with a few items, can be just enough. The island still ought to be virtually clear, allow to have the countertop material and surface area in the spotlight-these are critical selling points. This is how professional kitchen staging sometimes leaves the island pretty much clear to display the mass and function of the island. When your island contains storage, storage and organization are a concern in kitchen staging tips.
During presentations of the house, buyers will open these drawers and cabinets, so they, too, should be as organized and uncluttered as the rest of your kitchen’s storage. Follow the same old rules of the declutter, remove half of the storage, and organize. This home staging issue with respect to the meticulous cleanness in all of the storage spaces is that all the properties are properly maintained. One of the highlights of kitchen staging comes with the overhead lighting over the island. Pendant lighting is aesthetically pleasing and defines space within the kitchen. For a kitchen island that is void of overhead lighting, linking pendants would be a worthy investment— they make the most visual impact.
Choose fixtures that are proportional in size to the length of your island, since fixtures that are too small can make the island feel unwieldy, or fixtures that are too large can make the island feel even smaller. These expert kitchen staging tips award the island with exquisite sophistication. In a case that a kitchen does not have an island, think about whether relocating a portable island or large cart might enhance your kitchen staging tips. A nice, big piece on wheels provides functionality and visual appeal that an actual island might give, while still technically being furniture. This home staging kitchen strategy is great for an older, traditional home which may not have had an island in it before but that has space to put one. Make sure the piece looks nice and deliberate rather than rushed and cheap.
Photography Considerations in Kitchen Staging
While this guide focuses primarily on in-person showing preparation, kitchen staging tips must also consider photography since most buyers first see homes online. Professional kitchen staging with photography in mind ensures your listing images are compelling and generate maximum interest and showings.
Prepare for photography by implementing these kitchen staging ideas: turn on all lights for maximum brightness, open window treatments to let in natural light, ensure the sink is empty and dry, and remove anything from the refrigerator surface and front. Professional photographers typically shoot kitchens from multiple angles—the entrance looking in, from the living space if open concept, and interior corners showing major features. Your staging should work from all these viewpoints.
Consider the photographer’s perspective when arranging your kitchen staging tips elements. Lower vantage points make kitchens feel larger and more spacious, while higher angles can make them feel cramped. Professional kitchen staging often involves adjusting styling based on whether photos will be shot at standing height, slightly lower for dramatic effect, or from multiple levels. Discuss angles with your photographer and adjust your home staging kitchen setup accordingly.
Reflections matter in kitchen staging ideas, particularly for kitchens with extensive glass and stainless steel. Ensure windows are immaculately clean so outdoor views show clearly rather than streaks and smudges. Polish all appliances immediately before photography to eliminate fingerprints. These details seem minor but significantly impact professional photographs. Professional kitchen staging recognizes that camera lenses reveal flaws human eyes might overlook during in-person showings.
Wide-angle lenses used in real estate photography can distort spaces, making this relevant to kitchen staging tips. Items at the edges of photos may appear warped or disproportionate. Keep styling elements away from photo edges where distortion occurs. Ensure the room is balanced—excessive styling on one side creates composition problems. These home staging kitchen considerations help you create images that accurately represent your beautiful space.
Consider hiring a professional real estate photographer as part of your kitchen staging ideas investment. Quality photography costs relatively little compared to your home’s value but dramatically impacts online interest and showing requests. Professional photographers understand how to showcase kitchens optimally and work with your professional kitchen staging efforts to create compelling listing images. This investment typically returns many times its cost through increased buyer interest.
Final Touches Before Showings
Even the most thorough kitchen staging tips require final touches before each showing to ensure the space looks perfect when buyers arrive. Professional kitchen staging includes showing-day checklists that guarantee consistent presentation regardless of how you’ve been using the kitchen between appointments.
Create a showing checklist based on these kitchen staging ideas: wipe down all counters, polish the faucet and sink, sweep or vacuum the floor, turn on all lights, open window treatments, remove any items from refrigerator front, empty and hide the trash can, and check that your styling vignettes remain intact. Running through this quick home staging kitchen checklist before each showing ensures buyers see your kitchen at its absolute best every time.
Timing matters when implementing these final kitchen staging tips. Complete your showing preparation at least 30 minutes before buyers arrive, then vacate the property. Buyers want to envision themselves in the space, and seller presence inhibits this process. Leave the kitchen empty, beautifully staged, and perfectly clean for them to explore independently. This professional kitchen staging practice allows buyers to imagine their own lives in the space without distraction.
Temperature and comfort represent often-overlooked kitchen staging ideas. Ensure your home is at a comfortable temperature before showings—neither too hot nor too cold. Fresh, circulating air makes the kitchen feel pleasant and clean. If weather permits, opening a window for a few minutes before showings refreshes the air. These home staging kitchen details contribute to buyers’ overall comfort and impressions during their visit.
Consider the transition from other rooms into the kitchen when implementing kitchen staging tips. Buyers may enter from multiple directions—through a formal entryway, from the living room in open layouts, or from a mudroom or hallway. Each entry point should present an attractive, uncluttered view of your staged kitchen. Professional kitchen staging considers these transitions and ensures the kitchen looks beautiful from every approach angle.
Have a plan for maintaining your kitchen staging ideas throughout the selling period. This becomes challenging when you’re living in the home daily while it’s listed. Designate a specific area—perhaps in the pantry, garage, or basement—for all the items you’ve removed from the kitchen. Before each showing, you’ll pack away current items and restore your staging setup. This home staging kitchen system allows you to use your kitchen normally between showings while presenting it perfectly when buyers visit.